目錄
前情提要與架構規劃
參考專案: https://github.com/deviantony/docker-elk/tree/tls
由於此專案演示的,是將所有角色在單機上佈屬,
然後我這裡是要示範,如何在跨節點主機上,去佈屬各項角色,達到角色拆分。
主機規劃,與角色分配
| 主機名稱 | 主機IP | node.name | 角色 |
|---|---|---|---|
| k8s-master71u | 192.168.1.71 | elasticsearch01 | elasticsearch kibana |
| k8s-master72u | 192.168.1.72 | elasticsearch02 logstach02 | elasticsearch logstach |
| k8s-master73u | 192.168.1.73 | elasticsearch03 logstach03 | elasticsearch logstach |
目錄結構
root@k8s-master71u:/data/docker-elk# tree -a
# 目錄結構
.
├── docker-compose.yml
├── elasticsearch
│   ├── config
│   │   └── elasticsearch.yml
│   ├── data
│   │   ├── .gitignore
│   ├── Dockerfile
│   ├── .dockerignore
│   └── logs
│       └── .gitignore
├── .env
├── etc
│   ├── localtime
│   └── timezone
├── extensions
│   ├── curator
│   │   ├── config
│   │   │   ├── curator.yml
│   │   │   └── delete_log_files_curator.yml
│   │   ├── curator-compose.yml
│   │   ├── Dockerfile
│   │   ├── .dockerignore
│   │   └── README.md
│   ├── enterprise-search
│   │   ├── config
│   │   │   └── enterprise-search.yml
│   │   ├── Dockerfile
│   │   ├── .dockerignore
│   │   ├── enterprise-search-compose.yml
│   │   └── README.md
│   ├── filebeat
│   │   ├── config
│   │   │   └── filebeat.yml
│   │   ├── Dockerfile
│   │   ├── .dockerignore
│   │   ├── filebeat-compose.yml
│   │   └── README.md
│   ├── fleet
│   │   ├── agent-apmserver-compose.yml
│   │   ├── Dockerfile
│   │   ├── .dockerignore
│   │   ├── fleet-compose.yml
│   │   └── README.md
│   ├── heartbeat
│   │   ├── config
│   │   │   └── heartbeat.yml
│   │   ├── Dockerfile
│   │   ├── .dockerignore
│   │   ├── heartbeat-compose.yml
│   │   └── README.md
│   ├── logspout
│   │   ├── build.sh
│   │   ├── Dockerfile
│   │   ├── .dockerignore
│   │   ├── logspout-compose.yml
│   │   ├── modules.go
│   │   └── README.md
│   ├── metricbeat
│   │   ├── config
│   │   │   └── metricbeat.yml
│   │   ├── Dockerfile
│   │   ├── .dockerignore
│   │   ├── metricbeat-compose.yml
│   │   └── README.md
│   └── README.md
├── kibana
│   ├── config
│   │   └── kibana.yml
│   ├── data
│   ├── Dockerfile
│   └── .dockerignore
├── LICENSE
├── logstash
│   ├── config
│   │   └── logstash.yml
│   ├── Dockerfile
│   ├── .dockerignore
│   └── pipeline
│       └── logstash.conf
├── README.md
├── setup
│   ├── Dockerfile
│   ├── .dockerignore
│   ├── entrypoint.sh
│   ├── lib.sh
│   └── roles
│       ├── filebeat_writer.json
│       ├── heartbeat_writer.json
│       ├── logstash_writer.json
│       └── metricbeat_writer.json
└── tls
    ├── certs
    │   ├── apm-server
    │   │   ├── apm-server.crt
    │   │   └── apm-server.key
    │   ├── ca
    │   │   ├── ca.crt
    │   │   └── ca.key
    │   ├── elasticsearch
    │   │   ├── elasticsearch.crt
    │   │   └── elasticsearch.key
    │   ├── fleet-server
    │   │   ├── fleet-server.crt
    │   │   └── fleet-server.key
    │   ├── .gitignore
    │   └── kibana
    │       ├── kibana.crt
    │       └── kibana.key
    ├── Dockerfile
    ├── .dockerignore
    ├── entrypoint.sh
    ├── instances.yml
    └── README.md
Clone代碼,建立目錄
每一台皆要執行
# git clone項目
root@k8s-master71u:/data# git clone --branch tls https://github.com/deviantony/docker-elk.git
root@k8s-master71u:/data# cd docker-elk/
root@k8s-master71u:/data/docker-elk# ll
total 48
drwxr-xr-x 10 root root  4096 Oct 23 23:14 ./
drwxr-xr-x  3 root root    24 Oct 23 23:14 ../
-rw-r--r--  1 root root  5440 Oct 23 23:14 docker-compose.yml
drwxr-xr-x  3 root root    59 Oct 23 23:14 elasticsearch/
-rw-r--r--  1 root root  1502 Oct 23 23:14 .env
drwxr-xr-x  9 root root   143 Oct 23 23:14 extensions/
drwxr-xr-x  8 root root   163 Oct 23 23:14 .git/
-rw-r--r--  1 root root    83 Oct 23 23:14 .gitattributes
drwxr-xr-x  4 root root    45 Oct 23 23:14 .github/
drwxr-xr-x  3 root root    59 Oct 23 23:14 kibana/
-rw-r--r--  1 root root  1082 Oct 23 23:14 LICENSE
drwxr-xr-x  4 root root    75 Oct 23 23:14 logstash/
-rw-r--r--  1 root root 23158 Oct 23 23:14 README.md
drwxr-xr-x  3 root root    93 Oct 23 23:14 setup/
drwxr-xr-x  3 root root   117 Oct 23 23:14 tls/


# 建立共用檔案,放置目錄
root@k8s-master71u:/data/docker-elk# mkdir etc
root@k8s-master71u:/data/docker-elk# cd etc/
# 將localtime、timezone,校時與時區檔案傳入
root@k8s-master71u:/data/docker-elk# chmod 777 -R etc
root@k8s-master71u:/data/docker-elk# ll etc/
total 12
drwxrwxrwx  2 root root   39 Oct 23 23:17 ./
drwxr-xr-x 11 root root 4096 Oct 23 23:15 ../
-rwxrwxrwx  1 root root  764 Oct 23 23:17 localtime*
-rwxrwxrwx  1 root root   12 Oct 23 23:17 timezone*


# 建立各功能,所需目錄
root@k8s-master71u:/data/docker-elk# mkdir elasticsearch/data
root@k8s-master71u:/data/docker-elk# mkdir elasticsearch/logs
root@k8s-master71u:/data/docker-elk# chmod 777 -R elasticsearch/data
root@k8s-master71u:/data/docker-elk# chmod 777 -R elasticsearch/logs
root@k8s-master71u:/data/docker-elk# mkdir kibana/data
root@k8s-master71u:/data/docker-elk# chmod 777 -R kibana/data
修改.env設定
每一台皆要執行,ELASTIC版本指定,ELASTIC密碼,LOGSTASH_INTERNAL密碼,KIBANA_SYSTEM密碼,依當下需求修改,每一台保持一樣即可
root@b1-se-prometheus01:/data/docker-elk# cat  .env
ELASTIC_VERSION=8.6.1

## Passwords for stack users
#

# User 'elastic' (built-in)
#
# Superuser role, full access to cluster management and data indices.
# https://www.elastic.co/guide/en/elasticsearch/reference/current/built-in-users.html
ELASTIC_PASSWORD='changeme'

# User 'logstash_internal' (custom)
#
# The user Logstash uses to connect and send data to Elasticsearch.
# https://www.elastic.co/guide/en/logstash/current/ls-security.html
LOGSTASH_INTERNAL_PASSWORD='changeme'

# User 'kibana_system' (built-in)
#
# The user Kibana uses to connect and communicate with Elasticsearch.
# https://www.elastic.co/guide/en/elasticsearch/reference/current/built-in-users.html
KIBANA_SYSTEM_PASSWORD='changeme'

# Users 'metricbeat_internal', 'filebeat_internal' and 'heartbeat_internal' (custom)
#
# The users Beats use to connect and send data to Elasticsearch.
# https://www.elastic.co/guide/en/beats/metricbeat/current/feature-roles.html
METRICBEAT_INTERNAL_PASSWORD=''
FILEBEAT_INTERNAL_PASSWORD=''
HEARTBEAT_INTERNAL_PASSWORD=''

# User 'monitoring_internal' (custom)
#
# The user Metricbeat uses to collect monitoring data from stack components.
# https://www.elastic.co/guide/en/elasticsearch/reference/current/how-monitoring-works.html
MONITORING_INTERNAL_PASSWORD=''

# User 'beats_system' (built-in)
#
# The user the Beats use when storing monitoring information in Elasticsearch.
# https://www.elastic.co/guide/en/elasticsearch/reference/current/built-in-users.html
BEATS_SYSTEM_PASSWORD=''
生成憑證
選一台執行,再將生成憑證拷貝至其他主機
# 編寫instances主機資訊,要用來產生憑證
root@k8s-master71u:/data/docker-elk# vim tls/instances.yml

# This file is used by elasticsearch-certutil to generate X.509 certificates
# for stack components.
#
# Ref. https://www.elastic.co/guide/en/elasticsearch/reference/current/certutil.html#certutil-silent
# 多instance可以寫一起
instances:

- name: elasticsearch
  dns:
  - elasticsearch01
  - elasticsearch02
  - elasticsearch03
#  - elasticsearch  # Compose service, resolved by the embedded Docker DNS server name
#  - localhost      # local connections
  ip:
  - 192.168.1.71
  - 192.168.1.72
  - 192.168.1.73
#  - 127.0.0.1      # local connections
#  - ::1

- name: kibana
  dns:
  - kibana
#  - kibana.127.0.0.1.nip.io    # Examples of resolvable domains.
#  - kibana.127.0.0.1.sslip.io  #
#  - localhost
  ip:
  - 192.168.1.71
#  - 127.0.0.1
#  - ::1


# 執行tls容器,產生憑證
root@k8s-master71u:/data/docker-elk# docker-compose up tls
Attaching to docker-elk_tls_1
tls_1            | [+] CA certificate and key
tls_1            |    ⠿ Created
tls_1            |    ⠿ SHA256 fingerprint: 73cfd9c6c9220b46005ae2fcf0c0e1234093a70f4c62741ef9d701b192150a52
tls_1            |    ⠿   tls/certs/ca/ca.crt
tls_1            |    ⠿   tls/certs/ca/ca.key
tls_1            | [+] Server certificates and keys
tls_1            |    ⠿ Created
tls_1            |    ⠿   tls/certs/elasticsearch/elasticsearch.crt
tls_1            |    ⠿   tls/certs/elasticsearch/elasticsearch.key
tls_1            |    ⠿   tls/certs/kibana/kibana.crt
tls_1            |    ⠿   tls/certs/kibana/kibana.key
tls_1            |    ⠿   tls/certs/fleet-server/fleet-server.crt
tls_1            |    ⠿   tls/certs/fleet-server/fleet-server.key
tls_1            |    ⠿   tls/certs/apm-server/apm-server.crt
tls_1            |    ⠿   tls/certs/apm-server/apm-server.key


root@k8s-master71u:/data/docker-elk# scp -r tls/certs [email protected]:/data/docker-elk/tls/
root@k8s-master71u:/data/docker-elk# scp -r tls/certs [email protected]:/data/docker-elk/tls/
修改docker-compose設定
每一台皆要執行
# 佈署檔案docker-compose設定
root@k8s-master71u:/data/docker-elk# vim docker-compose.yml


version: '3.7'

services:

  # The 'tls' service runs a one-off script which initializes TLS certificates and
  # private keys for all components of the stack inside the local tls/ directory.
  #
  # This task only needs to be performed once, *before* the first stack startup.
  #
  # By default, it is excluded from the services started by 'docker compose up'
  # due to the non-default profile it belongs to. To run it, either provide the
  # '--profile=setup' CLI flag to Compose commands, or "up" the service by name
  # such as 'docker compose up tls'.
  tls:
    profiles:
      - setup
    build:
      context: tls/
      args:
        ELASTIC_VERSION: ${ELASTIC_VERSION}
    user: root  # ensures we can write to the local tls/ directory.
    init: true
    volumes:
      - ./tls/entrypoint.sh:/entrypoint.sh:ro,Z
      - ./tls/instances.yml:/usr/share/elasticsearch/tls/instances.yml:ro,Z
      - ./tls/certs:/usr/share/elasticsearch/tls/certs:z

  # The 'setup' service runs a one-off script which initializes users inside
  # Elasticsearch — such as 'logstash_internal' and 'kibana_system' — with the
  # values of the passwords defined in the '.env' file. It also creates the
  # roles required by some of these users.
  #
  # This task only needs to be performed once, during the *initial* startup of
  # the stack. Any subsequent run will reset the passwords of existing users to
  # the values defined inside the '.env' file, and the built-in roles to their
  # default permissions.
  #
  # By default, it is excluded from the services started by 'docker compose up'
  # due to the non-default profile it belongs to. To run it, either provide the
  # '--profile=setup' CLI flag to Compose commands, or "up" the service by name
  # such as 'docker compose up setup'.
  setup:
    profiles:
      - setup
    build:
      context: setup/
      args:
        ELASTIC_VERSION: ${ELASTIC_VERSION}
    init: true
    volumes:
      - ./setup/entrypoint.sh:/entrypoint.sh:ro,Z
      - ./setup/lib.sh:/lib.sh:ro,Z
      - ./setup/roles:/roles:ro,Z
      # (!) CA certificate. Generate using the 'tls' service.
      - ./tls/certs/ca/ca.crt:/ca.crt:ro,z
    environment:
      ELASTIC_PASSWORD: ${ELASTIC_PASSWORD:-}
      LOGSTASH_INTERNAL_PASSWORD: ${LOGSTASH_INTERNAL_PASSWORD:-}
      KIBANA_SYSTEM_PASSWORD: ${KIBANA_SYSTEM_PASSWORD:-}
      METRICBEAT_INTERNAL_PASSWORD: ${METRICBEAT_INTERNAL_PASSWORD:-}
      FILEBEAT_INTERNAL_PASSWORD: ${FILEBEAT_INTERNAL_PASSWORD:-}
      HEARTBEAT_INTERNAL_PASSWORD: ${HEARTBEAT_INTERNAL_PASSWORD:-}
      MONITORING_INTERNAL_PASSWORD: ${MONITORING_INTERNAL_PASSWORD:-}
      BEATS_SYSTEM_PASSWORD: ${BEATS_SYSTEM_PASSWORD:-}
    networks:
      - elk
    depends_on:
      - elasticsearch

  elasticsearch:
    build:
      context: elasticsearch/
      args:
        ELASTIC_VERSION: ${ELASTIC_VERSION}
    volumes:
      - ./elasticsearch/config/elasticsearch.yml:/usr/share/elasticsearch/config/elasticsearch.yml:ro,Z
      # elasticsearch存放data與logs目錄,依需求自行定義
      - ./elasticsearch/data:/usr/share/elasticsearch/data:Z
      - ./elasticsearch/logs:/usr/share/elasticsearch/logs:Z
      # (!) TLS certificates. Generate using the 'tls' service.
      - ./tls/certs/ca/ca.crt:/usr/share/elasticsearch/config/ca.crt:ro,z
      - ./tls/certs/elasticsearch/elasticsearch.crt:/usr/share/elasticsearch/config/elasticsearch.crt:ro,z
      - ./tls/certs/elasticsearch/elasticsearch.key:/usr/share/elasticsearch/config/elasticsearch.key:ro,z
      # 校時文件
      - ./etc/localtime:/etc/localtime
      - ./etc/timezone:/etc/timezone
    ports:
      - 9200:9200
      - 9300:9300
    environment:
      # node.name 每一台要不一樣
      node.name: elasticsearch01
      ES_JAVA_OPTS: -Xms512m -Xmx512m
      # Bootstrap password.
      # Used to initialize the keystore during the initial startup of
      # Elasticsearch. Ignored on subsequent runs.
      ELASTIC_PASSWORD: ${ELASTIC_PASSWORD:-}
      # Use single node discovery in order to disable production mode and avoid bootstrap checks.
      # see: https://www.elastic.co/guide/en/elasticsearch/reference/current/bootstrap-checks.html
      #discovery.type: single-node
      # 主機IP
      network.publish_host: 192.168.1.71
      # Use other cluster nodes for unicast discovery.
      discovery.seed_hosts: 192.168.1.71:9300,192.168.1.72:9300,192.168.1.73:9300
      # Define initial masters, assuming a cluster size of at least 3.
      cluster.initial_master_nodes: 192.168.1.71,192.168.1.72,192.168.1.73
    networks:
      - elk
    restart: unless-stopped

  logstash:
    build:
      context: logstash/
      args:
        ELASTIC_VERSION: ${ELASTIC_VERSION}
    volumes:
      - ./logstash/config/logstash.yml:/usr/share/logstash/config/logstash.yml:ro,Z
      - ./logstash/pipeline:/usr/share/logstash/pipeline:ro,Z
      # (!) CA certificate. Generate using the 'tls' service.
      - ./tls/certs/ca/ca.crt:/usr/share/logstash/config/ca.crt:ro,z
      # 校時文件
      - ./etc/localtime:/etc/localtime
      - ./etc/timezone:/etc/timezone
    ports:
      - 5044:5044
      - 50000:50000/tcp
      - 50000:50000/udp
      - 9600:9600
    environment:
      LS_JAVA_OPTS: -Xms256m -Xmx256m
      LOGSTASH_INTERNAL_PASSWORD: ${LOGSTASH_INTERNAL_PASSWORD:-}
    networks:
      - elk
    depends_on:
      - elasticsearch
    restart: unless-stopped

  kibana:
    build:
      context: kibana/
      args:
        ELASTIC_VERSION: ${ELASTIC_VERSION}
    volumes:
      - ./kibana/config/kibana.yml:/usr/share/kibana/config/kibana.yml:ro,Z
      # kibana存放data目錄,依需求自行定義
      - ./kibana/data:/usr/share/kibana/data:Z
      # (!) TLS certificates. Generate using the 'tls' service.
      - ./tls/certs/ca/ca.crt:/usr/share/kibana/config/ca.crt:ro,z
      - ./tls/certs/kibana/kibana.crt:/usr/share/kibana/config/kibana.crt:ro,Z
      - ./tls/certs/kibana/kibana.key:/usr/share/kibana/config/kibana.key:ro,Z
      # 校時文件
      - ./etc/localtime:/etc/localtime
      - ./etc/timezone:/etc/timezone
    ports:
      - 5601:5601
    environment:
      KIBANA_SYSTEM_PASSWORD: ${KIBANA_SYSTEM_PASSWORD:-}
    networks:
      - elk
    depends_on:
      - elasticsearch
    restart: unless-stopped

networks:
  elk:
    driver: bridge

volumes:
  elasticsearch:
修改elasticsearch設定
需要安裝elasticsearch的執行
# elasticsearch 設定檔設定
root@k8s-master71u:/data/docker-elk# vim elasticsearch/config/elasticsearch.yml


---
## Default Elasticsearch configuration from Elasticsearch base image.
## https://github.com/elastic/elasticsearch/blob/main/distribution/docker/src/docker/config/elasticsearch.yml
#
# cluster.name名稱,依需求自行定義
cluster.name: elk-cluster
network.host: 0.0.0.0

## X-Pack settings
## see https://www.elastic.co/guide/en/elasticsearch/reference/current/security-settings.html
#
# 修改license,由trial改成basic
xpack.license.self_generated.type: basic
xpack.security.enabled: true

##
## TLS configuration
## See instructions from README to enable.
##

## Communications between nodes in a cluster
## see https://www.elastic.co/guide/en/elasticsearch/reference/current/configuring-tls.html#tls-transport
#
xpack.security.transport.ssl.enabled: true
xpack.security.transport.ssl.verification_mode: certificate
xpack.security.transport.ssl.certificate_authorities: [ ca.crt ]
xpack.security.transport.ssl.certificate: elasticsearch.crt
xpack.security.transport.ssl.key: elasticsearch.key

## HTTP client communications
## see https://www.elastic.co/guide/en/elasticsearch/reference/current/configuring-tls.html#tls-http
#
xpack.security.http.ssl.enabled: true
xpack.security.http.ssl.certificate_authorities: [ ca.crt ]
xpack.security.http.ssl.certificate: elasticsearch.crt
xpack.security.http.ssl.key: elasticsearch.key
修改kibana設定
需要安裝kibana的執行
# kibana 設定檔設定
root@k8s-master71u:/data/docker-elk# vim kibana/config/kibana.yml
---
## Default Kibana configuration from Kibana base image.
## https://github.com/elastic/kibana/blob/main/src/dev/build/tasks/os_packages/docker_generator/templates/kibana_yml.template.ts
#
server.name: kibana
server.host: 0.0.0.0
# 多節點elasticsearch,都寫上
elasticsearch.hosts: [ "https://192.168.1.71:9200","https://192.168.1.72:9200","https://192.168.1.73:9200" ]

monitoring.ui.container.elasticsearch.enabled: true
monitoring.ui.container.logstash.enabled: true

## X-Pack security credentials
#
elasticsearch.username: kibana_system
elasticsearch.password: ${KIBANA_SYSTEM_PASSWORD}

##
## TLS configuration
## See instructions from README to enable.
##

## Communications between Kibana and Elasticsearch
## see https://www.elastic.co/guide/en/kibana/current/configuring-tls.html#configuring-tls-kib-es
#
# 寫上根憑證位置
elasticsearch.ssl.certificateAuthorities: [ config/ca.crt ]

## Communications between web browsers and Kibana
## see https://www.elastic.co/guide/en/kibana/current/configuring-tls.html#configuring-tls-browser-kib
#
# 開啟kibana ssl,填寫憑證位置
server.ssl.enabled: true
server.ssl.certificate: config/kibana.crt
server.ssl.key: config/kibana.key

## Encryption keys (optional but highly recommended)
##
## Generate with either
##  $ docker container run --rm docker.elastic.co/kibana/kibana:8.6.2 bin/kibana-encryption-keys generate
##  $ openssl rand -hex 32
##
## https://www.elastic.co/guide/en/kibana/current/using-kibana-with-security.html
## https://www.elastic.co/guide/en/kibana/current/kibana-encryption-keys.html
#
#xpack.security.encryptionKey:
#xpack.encryptedSavedObjects.encryptionKey:
#xpack.reporting.encryptionKey:

## Fleet
## https://www.elastic.co/guide/en/kibana/current/fleet-settings-kb.html
#
xpack.fleet.agents.fleet_server.hosts: [ https://fleet-server:8220 ]

xpack.fleet.outputs:
  - id: fleet-default-output
    name: default
    type: elasticsearch
    # 多節點elasticsearch,都寫上
    hosts: [ "https://192.168.1.71:9200","https://192.168.1.72:9200","https://192.168.1.73:9200" ]
    # Set to output of 'docker-compose up tls'. Example:
    #ca_trusted_fingerprint: 846637d1bb82209640d31b79869a370c8e47c2dc15c7eafd4f3d615e51e3d503
    is_default: true
    is_default_monitoring: true

xpack.fleet.packages:
  - name: fleet_server
    version: latest
  - name: system
    version: latest
  - name: elastic_agent
    version: latest
  - name: apm
    version: latest

xpack.fleet.agentPolicies:
  - name: Fleet Server Policy
    id: fleet-server-policy
    description: Static agent policy for Fleet Server
    monitoring_enabled:
      - logs
      - metrics
    package_policies:
      - name: fleet_server-1
        package:
          name: fleet_server
      - name: system-1
        package:
          name: system
      - name: elastic_agent-1
        package:
          name: elastic_agent
  - name: Agent Policy APM Server
    id: agent-policy-apm-server
    description: Static agent policy for the APM Server integration
    monitoring_enabled:
      - logs
      - metrics
    package_policies:
      - name: system-1
        package:
          name: system
      - name: elastic_agent-1
        package:
          name: elastic_agent
      - name: apm-1
        package:
          name: apm
        # See the APM package manifest for a list of possible inputs.
        # https://github.com/elastic/apm-server/blob/v8.5.0/apmpackage/apm/manifest.yml#L41-L168
        inputs:
          - type: apm
            vars:
              - name: host
                value: 0.0.0.0:8200
              - name: url
                value: https://apm-server:8200
              - name: tls_enabled
                value: true
              - name: tls_certificate
                value: /usr/share/elastic-agent/apm-server.crt
              - name: tls_key
                value: /usr/share/elastic-agent/apm-server.key
修改logstash設定
需要安裝logstash的執行
# logstash 設定檔設定
root@k8s-master72u:/data/docker-elk# vim logstash/config/logstash.yml


---
## Default Logstash configuration from Logstash base image.
## https://github.com/elastic/logstash/blob/main/docker/data/logstash/config/logstash-full.yml
#
http.host: 0.0.0.0
# node.name 每一台要不一樣
node.name: logstash02


# 測試抓容器內的log,發送到elasticsearch是否成功
root@k8s-master72u:/data/docker-elk# vim logstash/pipeline/logstash.conf
input {
        beats {
                port => 5044
        }

        tcp {
                port => 50000
        }
        file {
                path => ["/var/log/bootstrap.log"]
                type => "system"
                start_position => "beginning"
        }
}

## Add your filters / logstash plugins configuration here

output {
        elasticsearch {
                hosts => ["192.168.1.71:9200","192.168.1.72:9200","192.168.1.73:9200"]
                user => "logstash_internal"
                password => "${LOGSTASH_INTERNAL_PASSWORD}"
                ssl => true
                cacert => "config/ca.crt"
                index => "logstash-%{+YYYY.MM.dd}"
                codec => "rubydebug"
        }
}
啟動setup與elasticsearch
需要安裝elasticsearch的執行
# setup腳本會帶憑證去判斷elasticsearch是否存活了,判斷存活才會設定elasticsearch所需要的帳號和密碼
# 所以將setup腳本中的環境變數elasticsearch:9200,替換成node.name名稱(前面有定義過)
root@k8s-master71u:/data/docker-elk# sed -i 's/elasticsearch:9200/elasticsearch01:9200/g' setup/lib.sh
root@k8s-master72u:/data/docker-elk# sed -i 's/elasticsearch:9200/elasticsearch02:9200/g' setup/lib.sh
root@k8s-master73u:/data/docker-elk# sed -i 's/elasticsearch:9200/elasticsearch03:9200/g' setup/lib.sh

# 添加hosts,node.name
root@k8s-master71u:/data/docker-elk# vim /etc/hosts
192.168.1.71 elasticsearch01
192.168.1.72 elasticsearch02
192.168.1.73 elasticsearch03
root@k8s-master72u:/data/docker-elk# vim /etc/hosts
192.168.1.71 elasticsearch01
192.168.1.72 elasticsearch02
192.168.1.73 elasticsearch03
root@k8s-master73u:/data/docker-elk# vim /etc/hosts
192.168.1.71 elasticsearch01
192.168.1.72 elasticsearch02
192.168.1.73 elasticsearch03
**需要安裝elasticsearch的執行
# 執行setup容器,啟動elasticsearch,並設定elasticsearch所需要使用到的帳號和密碼
root@k8s-master71u:/data/docker-elk# docker-compose up setup
root@k8s-master72u:/data/docker-elk# docker-compose up setup
root@k8s-master73u:/data/docker-elk# docker-compose up setup


# 可以看到以下,就是elasticsearch成功啟動,且已設定elasticsearch所需要使用到的帳號和密碼
root@k8s-master71u:/data/docker-elk# docker-compose up setup
docker-elk_elasticsearch_1 is up-to-date
Starting docker-elk_setup_1 ... done
Attaching to docker-elk_setup_1
setup_1          | [+] Waiting for availability of Elasticsearch. This can take several minutes.
setup_1          |    ⠿ Elasticsearch is running
setup_1          | [+] Waiting for initialization of built-in users
setup_1          |    ⠿ Built-in users were initialized
setup_1          | [+] Role 'heartbeat_writer'
setup_1          |    ⠿ Creating/updating
setup_1          | [+] Role 'metricbeat_writer'
setup_1          |    ⠿ Creating/updating
setup_1          | [+] Role 'filebeat_writer'
setup_1          |    ⠿ Creating/updating
setup_1          | [+] Role 'logstash_writer'
setup_1          |    ⠿ Creating/updating
setup_1          | [+] User 'filebeat_internal'
setup_1          |    ⠿ No password defined, skipping
setup_1          | [+] User 'kibana_system'
setup_1          |    ⠿ User exists, setting password
setup_1          | [+] User 'logstash_internal'
setup_1          |    ⠿ User exists, setting password
setup_1          | [+] User 'heartbeat_internal'
setup_1          |    ⠿ No password defined, skipping
setup_1          | [+] User 'metricbeat_internal'
setup_1          |    ⠿ No password defined, skipping
setup_1          | [+] User 'monitoring_internal'
setup_1          |    ⠿ No password defined, skipping
setup_1          | [+] User 'beats_system'
setup_1          |    ⠿ No password defined, skipping
docker-elk_setup_1 exited with code 0


root@k8s-master71u:/data/docker-elk# docker ps | grep -i elk
13130e0e2653   docker-elk_elasticsearch    "/bin/tini -- /usr/l…"   3 minutes ago   Up 3 minutes   0.0.0.0:9200->9200/tcp, :::9200->9200/tcp, 0.0.0.0:9300->9300/tcp, :::9300->9300/tcp   docker-elk_elasticsearch_1
https://192.168.1.71:9200/
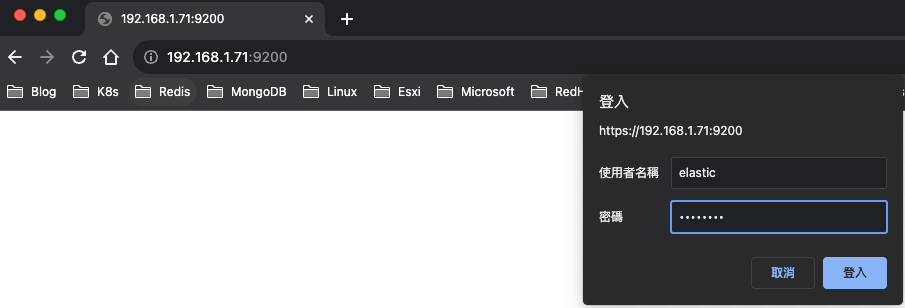

https://192.168.1.71:9200/_cat/health?v

啟動kibana
需要安裝kibana的執行
# 執行kibana容器,啟動kibana
root@k8s-master71u:/data/docker-elk# docker-compose up -d kibana


root@k8s-master71u:/data/docker-elk# docker ps | grep -i elk
a652860861bc   docker-elk_kibana           "/bin/tini -- /usr/l…"   45 seconds ago   Up 38 seconds   0.0.0.0:5601->5601/tcp, :::5601->5601/tcp                                              docker-elk_kibana_1
13130e0e2653   docker-elk_elasticsearch    "/bin/tini -- /usr/l…"   11 minutes ago   Up 11 minutes   0.0.0.0:9200->9200/tcp, :::9200->9200/tcp, 0.0.0.0:9300->9300/tcp, :::9300->9300/tcp   docker-elk_elasticsearch_1
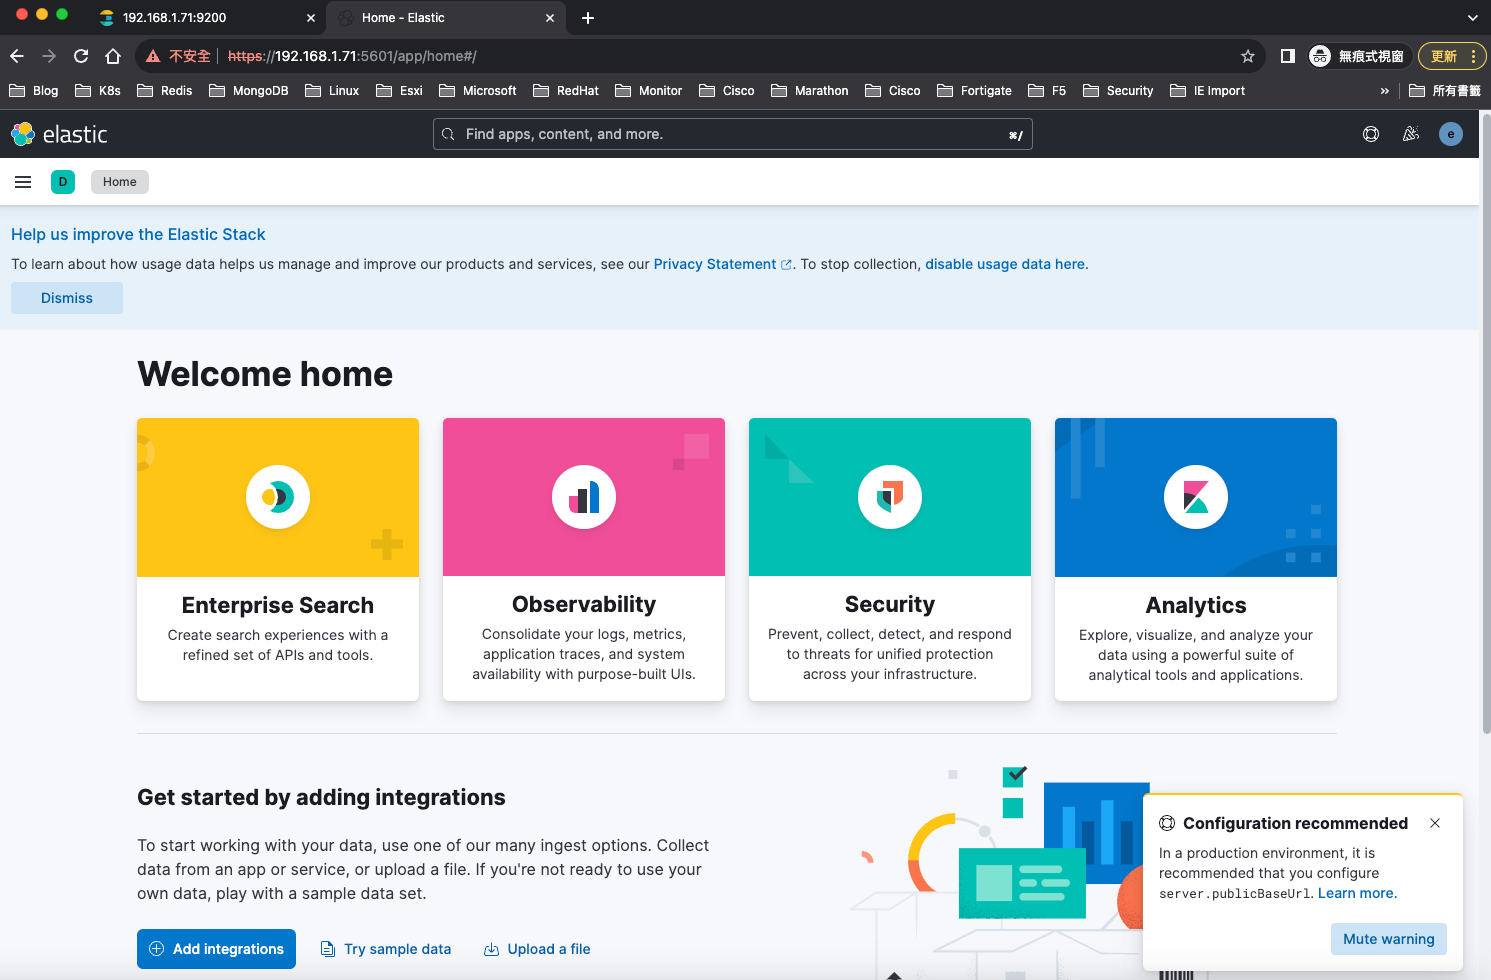
https://192.168.1.71:5601/

啟動logstash
需要安裝logstash的執行
# 執行logstash容器,啟動logstash
root@k8s-master72u:/data/docker-elk# docker-compose up -d logstash
root@k8s-master73u:/data/docker-elk# docker-compose up -d logstash


root@k8s-master72u:/data/docker-elk# docker ps | grep -i elk
c7712d2eb7bd   docker-elk_logstash         "/usr/local/bin/dock…"   31 seconds ago   Up 30 seconds   0.0.0.0:5044->5044/tcp, :::5044->5044/tcp, 0.0.0.0:9600->9600/tcp, :::9600->9600/tcp, 0.0.0.0:50000->50000/tcp, :::50000->50000/tcp, 0.0.0.0:50000->50000/udp, :::50000->50000/udp   docker-elk_logstash_1
678934a90729   docker-elk_elasticsearch    "/bin/tini -- /usr/l…"   13 minutes ago   Up 13 minutes   0.0.0.0:9200->9200/tcp, :::9200->9200/tcp, 0.0.0.0:9300->9300/tcp, :::9300->9300/tcp                                                                                                 docker-elk_elasticsearch_1
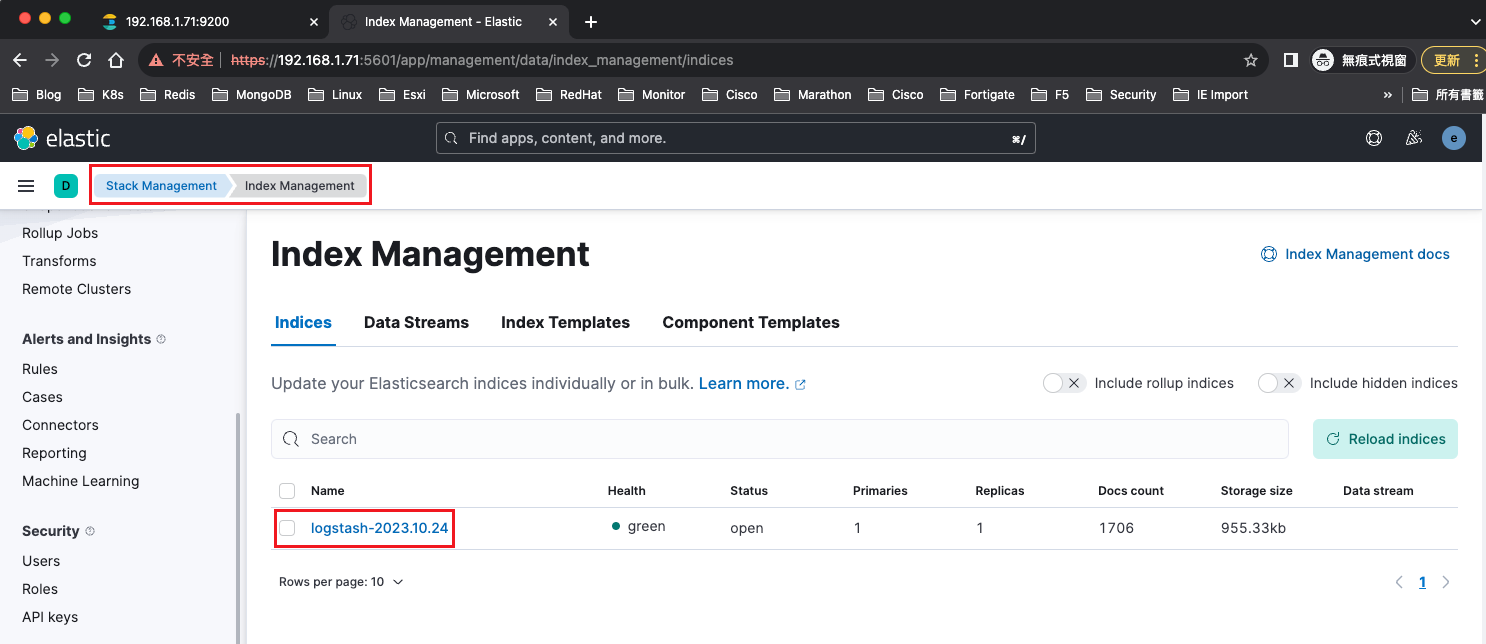
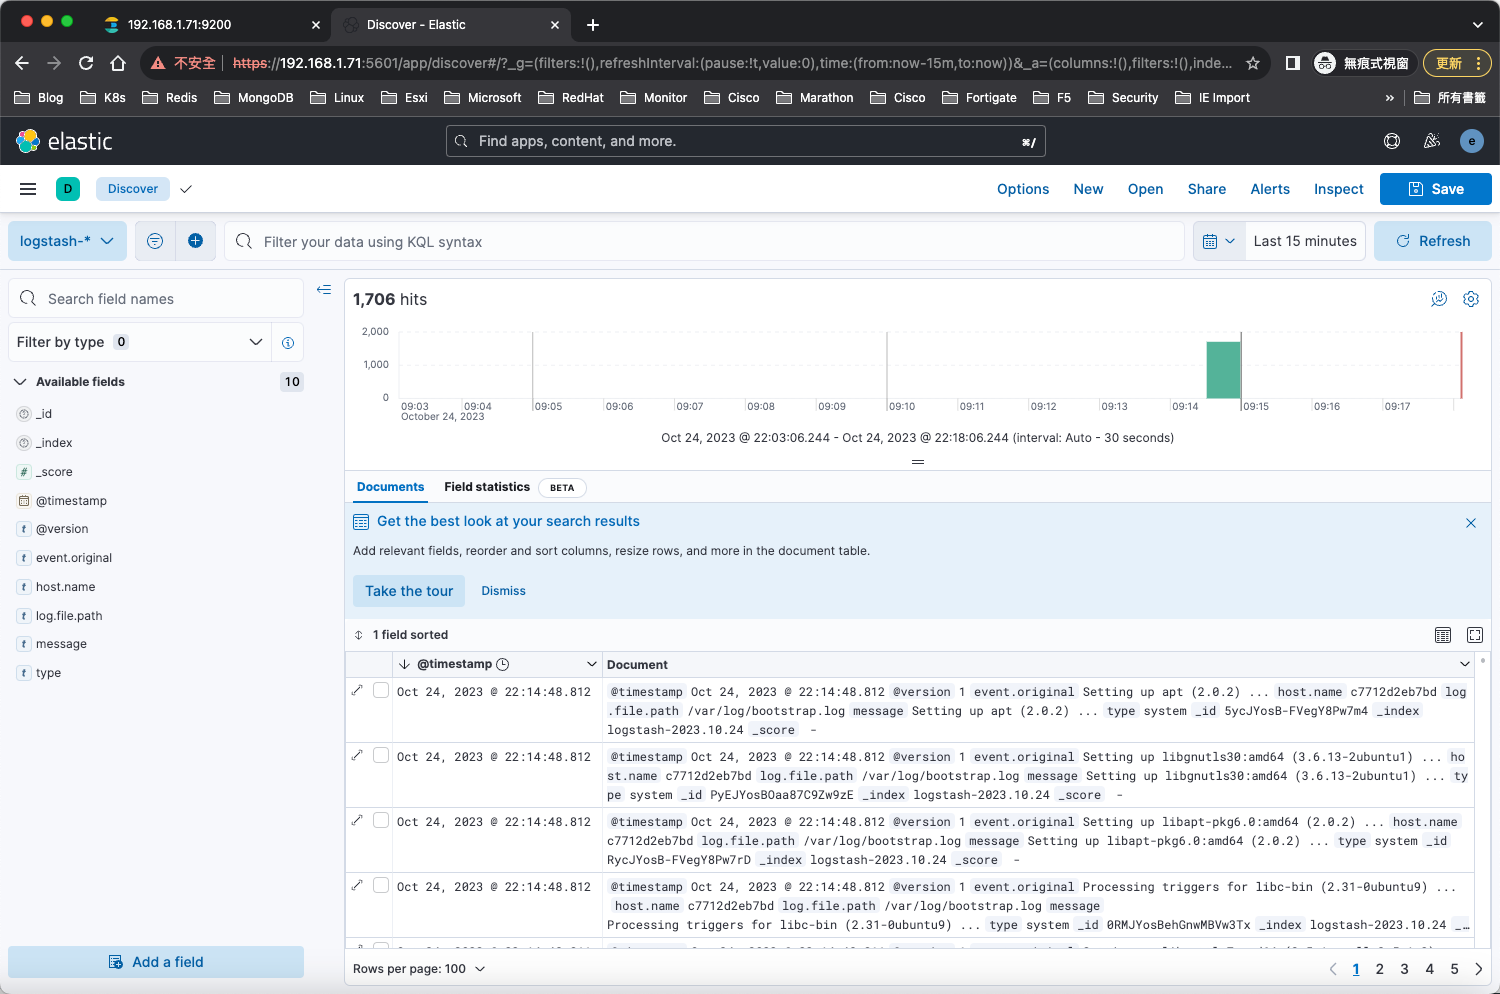
可以從kibana頁面看到,有索引進來了
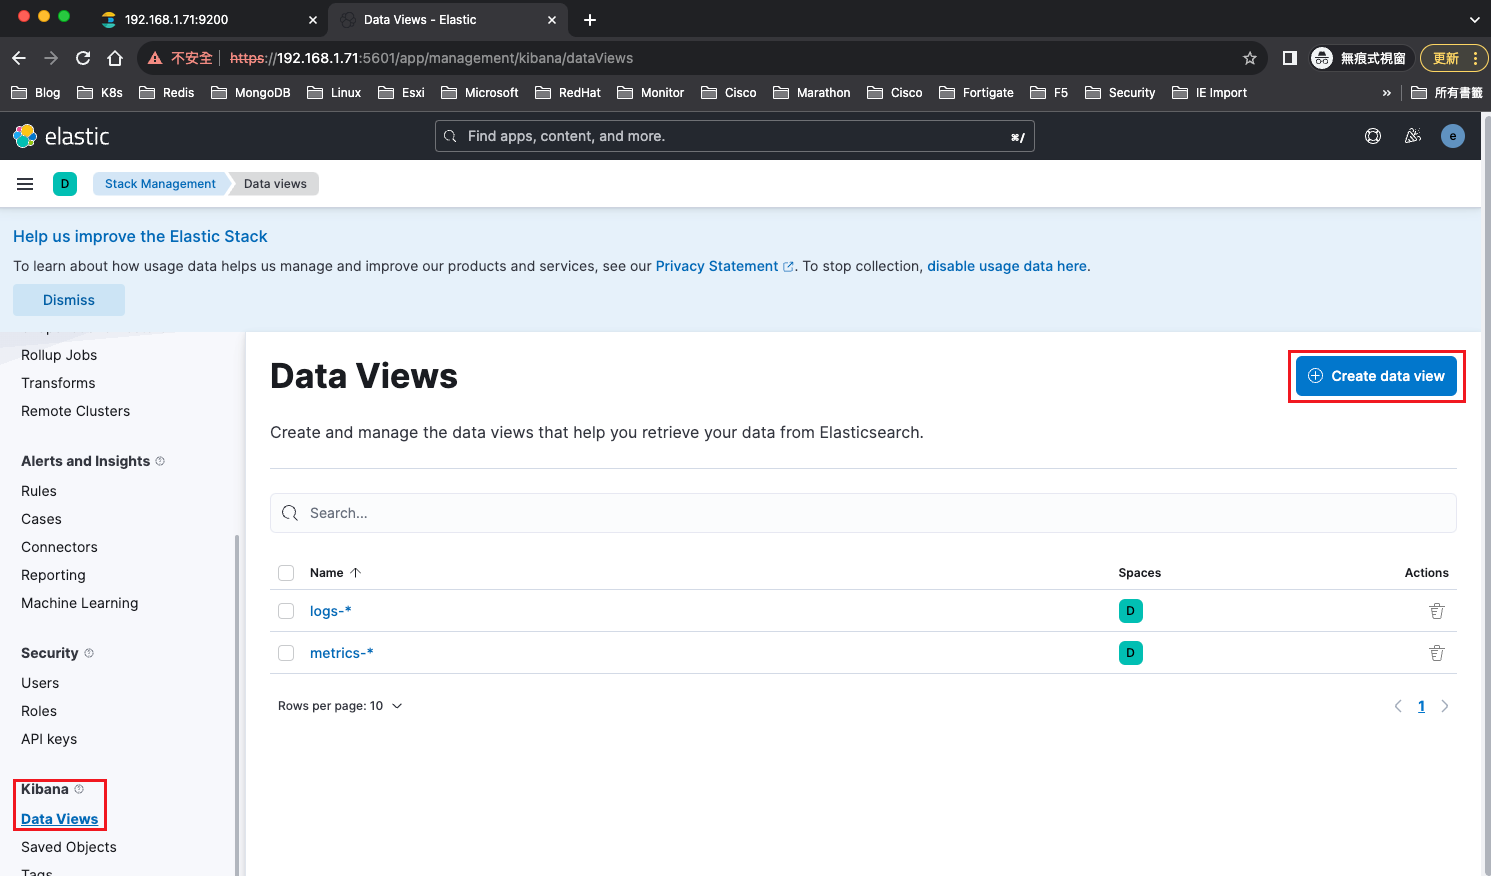
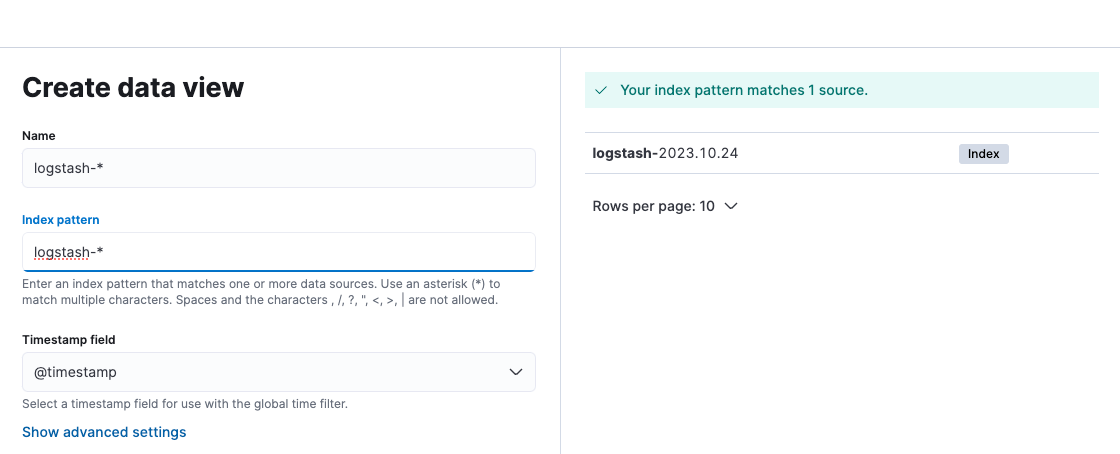
創建Data Views
可以從Discover查看到收集的log訊息了
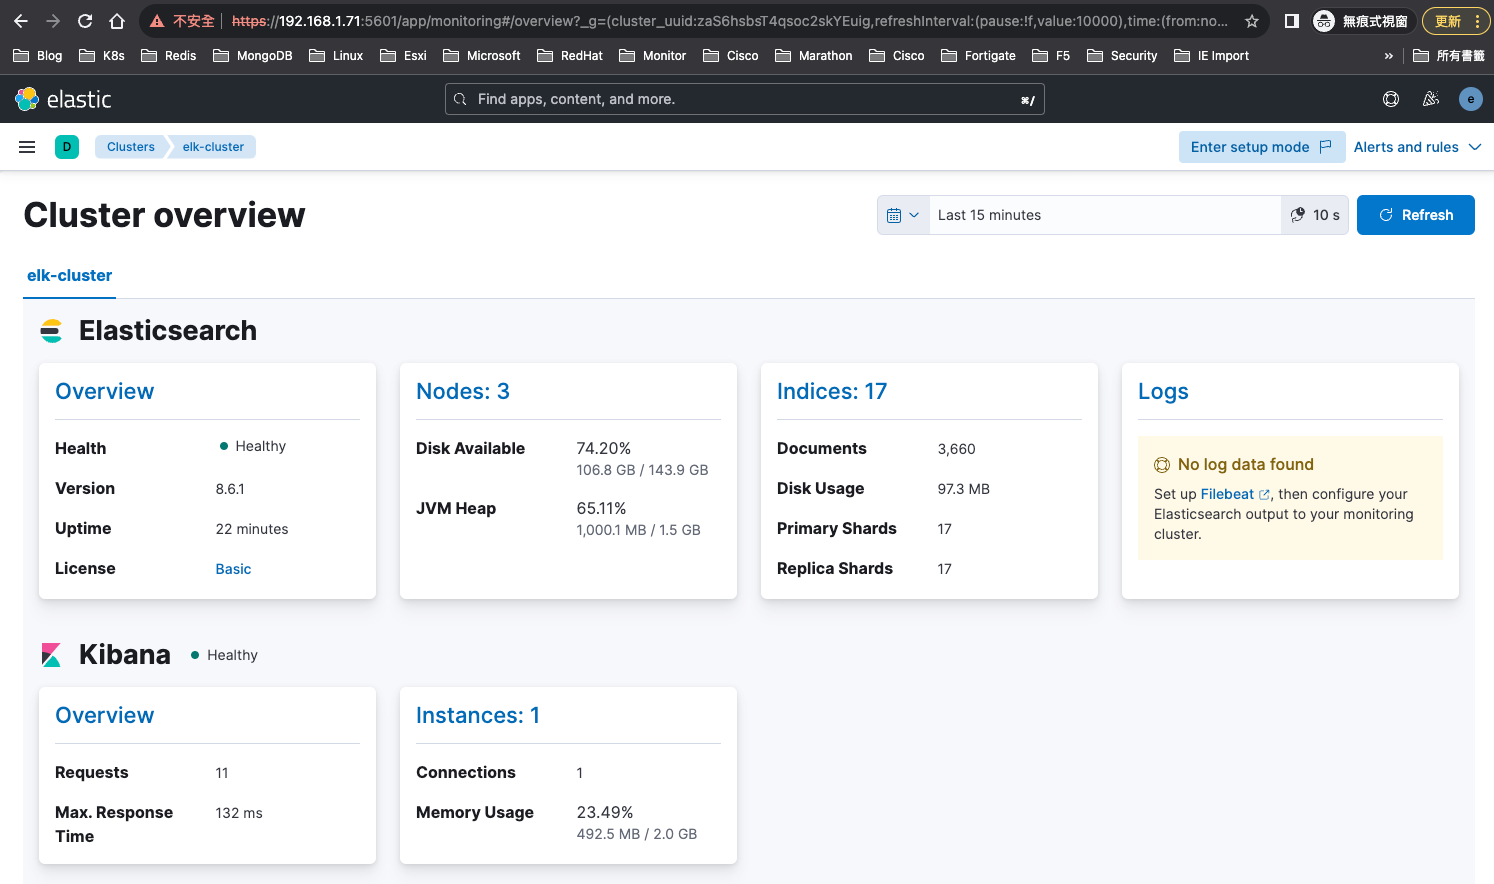
點擊,Stack Monitoring
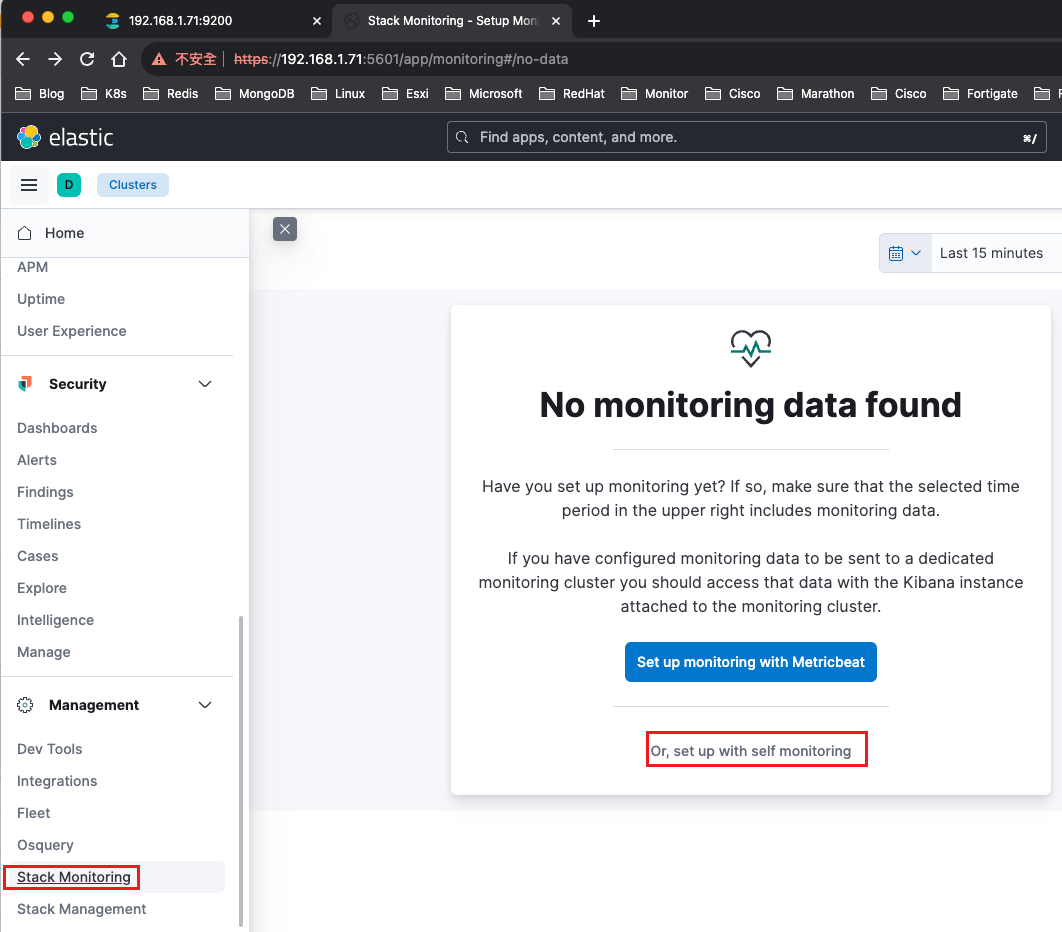
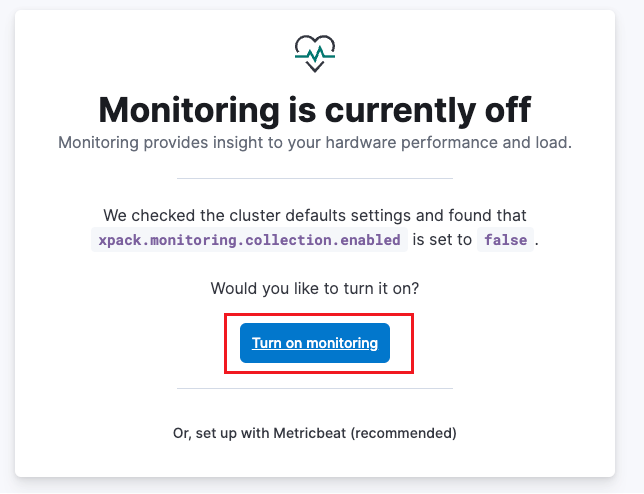 可以簡單看到elasticsearch和kibana的狀態
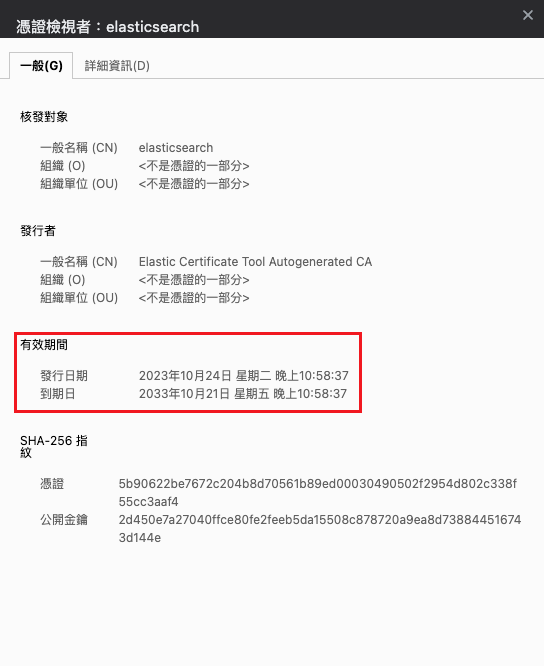
(注意)自簽憑證3年到期
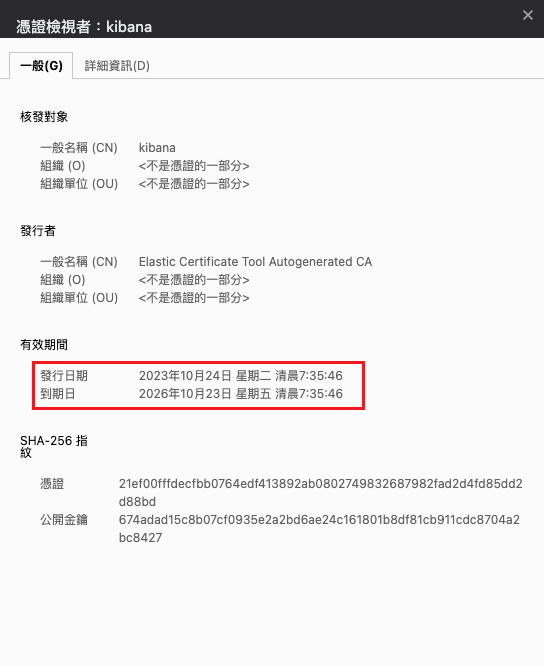
重新頒發憑證(並改10年到期)
停掉所有elasticsearch和kibana和logstash
root@k8s-master71u:/data/docker-elk# docker-compose down
root@k8s-master72u:/data/docker-elk# docker-compose down
root@k8s-master73u:/data/docker-elk# docker-compose down

root@k8s-master71u:/data/docker-elk# docker-compose ps
Name   Command   State   Ports
------------------------------

root@k8s-master72u:/data/docker-elk# docker-compose ps
Name   Command   State   Ports
------------------------------

root@k8s-master73u:/data/docker-elk# docker-compose ps
Name   Command   State   Ports
------------------------------
刪除原本憑證
root@k8s-master71u:/data/docker-elk# rm -rf tls/certs/*
root@k8s-master72u:/data/docker-elk# rm -rf tls/certs/*
root@k8s-master73u:/data/docker-elk# rm -rf tls/certs/*
選一台執行,再將生成憑證拷貝至其他主機
# 修改憑證頒發到期時間為10年,有bin/elasticsearch-certutil這段,都加上--days 3650
root@k8s-master71u:/data/docker-elk# vim tls/entrypoint.sh


echo '[+] CA certificate and key'

if [ ! -f tls/certs/ca/ca.key ]; then
        symbol=⠿

        bin/elasticsearch-certutil ca \
                --days 3650 \
                --silent \
                --pem \
                --out tls/certs/ca.zip


echo '[+] Server certificates and keys'

if [ ! -f tls/certs/elasticsearch/elasticsearch.key ]; then
        symbol=⠿

        bin/elasticsearch-certutil cert \
                --days 3650 \
                --silent \
                --pem \
                --in tls/instances.yml \
                --ca-cert tls/certs/ca/ca.crt \
                --ca-key tls/certs/ca/ca.key \
                --out tls/certs/certs.zip


# 頒發憑證
root@k8s-master71u:/data/docker-elk# docker-compose up tls
Creating network "docker-elk_default" with the default driver
Creating network "docker-elk_elk" with driver "bridge"
Creating docker-elk_tls_1 ... done
Attaching to docker-elk_tls_1
tls_1            | [+] CA certificate and key
tls_1            |    ⠿ Created
tls_1            |    ⠿ SHA256 fingerprint: d93ccec000656ad3cd2ea04e1de39c0c2d32eef1b20b32a117d3c92469ed94fb
tls_1            |    ⠿   tls/certs/ca/ca.crt
tls_1            |    ⠿   tls/certs/ca/ca.key
tls_1            | [+] Server certificates and keys
tls_1            |    ⠿ Created
tls_1            |    ⠿   tls/certs/elasticsearch/elasticsearch.crt
tls_1            |    ⠿   tls/certs/elasticsearch/elasticsearch.key
tls_1            |    ⠿   tls/certs/kibana/kibana.crt
tls_1            |    ⠿   tls/certs/kibana/kibana.key
tls_1            |    ⠿   tls/certs/fleet-server/fleet-server.crt
tls_1            |    ⠿   tls/certs/fleet-server/fleet-server.key
tls_1            |    ⠿   tls/certs/apm-server/apm-server.crt
tls_1            |    ⠿   tls/certs/apm-server/apm-server.key
docker-elk_tls_1 exited with code 0


root@k8s-master71u:/data/docker-elk# scp -r tls/certs [email protected]:/data/docker-elk/tls/
root@k8s-master71u:/data/docker-elk# scp -r tls/certs [email protected]:/data/docker-elk/tls/
將各台服務啟動
root@k8s-master71u:/data/docker-elk# docker-compose up -d elasticsearch
root@k8s-master72u:/data/docker-elk# docker-compose up -d elasticsearch
root@k8s-master73u:/data/docker-elk# docker-compose up -d elasticsearch

root@k8s-master71u:/data/docker-elk# docker-compose up -d kibana

root@k8s-master72u:/data/docker-elk# docker-compose up -d logstash
root@k8s-master73u:/data/docker-elk# docker-compose up -d logstash
https://192.168.1.71:9200/
elasticsearch憑證更換成10年了
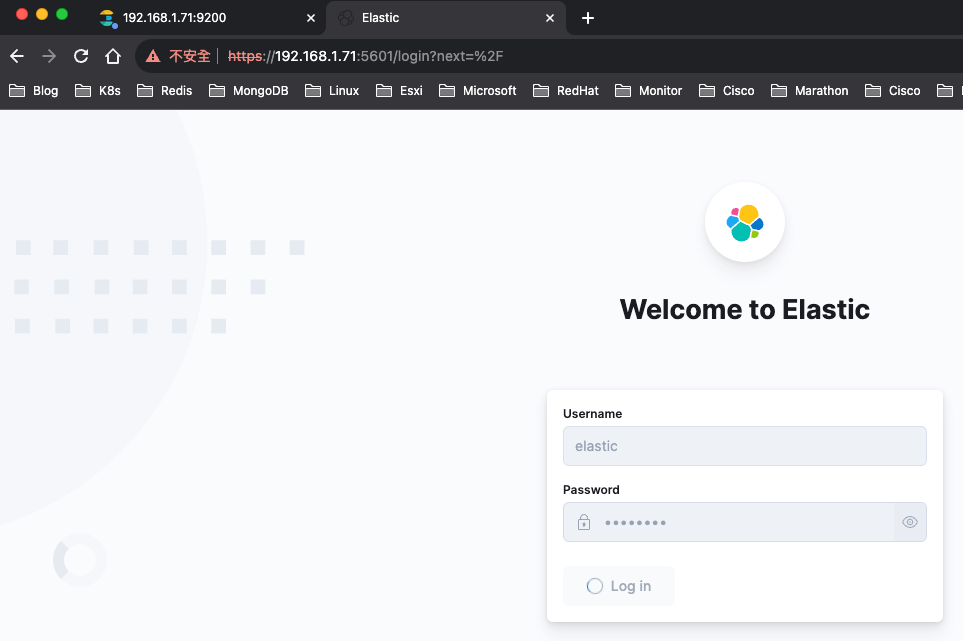
kibana可以正常登入
kibana憑證更換成10年了

資料也有正常進來了,完成更換憑證
